SharePoint Designer 2013 Workflow changes
Already, there are so
many articles published about the new features and changes in SharePoint
Designer 2013 that it’s a little late to write about this. But I think this would
be useful.
There are many new
functionalities and enhancements added into SharePoint designer 2013.
Added
features allow designers to do more with workflows without requiring a
developer to write custom code.

1. Stages
With 2013, concept of
stage is introduced. It acts as containers in workflow, which allows one to
structure the workflow from one stage to the other. Stages can be added to a
workflow by clicking on Stage icon.

Key
points for Stages:
- All actions in the
workflow must be contained in a stage
- A stage can hold one
or more workflow actions, and will also have only one Transition to stage area.
- The Transition to stage area
defines how the workflow exits the stage after its actions have been
processed. The stage can be configured to transition to another stage, or
to end the workflow.
- Workflows must have
at least one stage, and it is not possible to nest stages in a workflow.
2. Actions
In 2013
new workflow actions are also introduced and they can be used while designing
workflow.

Adding
this action to a workflow allows a designer to create a single task, assign it
to a specific user, and save the Outcome and TaskID values to workflow
variables.

3. Assign a Task
Click on "Assign
a task" action from actions menu, and the container displayed in
above image, will show up.
Now click on thisuser,
which will open the following dialogue.

4. Start a Task Process:
This
action is the same as “Assign a Task” action,
with the difference being that multiple participants can be assigned to the
task being created. The participants can be assigned to the task one at a time
(serial, meaning the first participant must respond to the task before the next
participant is assigned, and so on.), or all participants can be assigned to
the task at the same time (parallel).

5. Loops
There
are two types of looping available:
- Loop n Times: Loop type allows a designer to
create a looping condition where the actions contained in the loop
container are executed a specified number of times.
- The Loop with Condition: Loop type allows a designer to
create a looping condition where the actions contained in the loop
container are executed until a specified condition is met.

Key points for loops:
- Loops must be contained within a
stage.
- A stage can be added inside a loop.
- Loops can have only one entry and
only one exit point.
- Nested loops are
also supported.
6. Call HTTP Web Service
This
action allows you to call a REST-based web service without writing custom code.
You specify the URL to the web service you wish to call, along with the HTTP
method (GET, PUT, POST, and DELETE).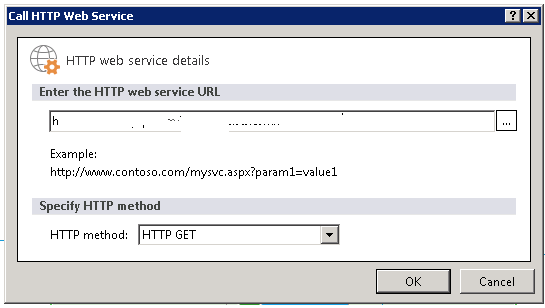
7. Visual Designer
In
SharePoint Designer 2013 the Visual Designer is also introduced. This designer
is only available for workflows on the 2013 platform, and you will need Visio
2013 Professional installed on your PC to have this available in SharePoint
Designer.
When
creating a workflow, you can switch to the Visual Designer by selecting it from
the ribbon:

This will switch the view of the workflow you are designing to a view that looks a lot like a diagram in Visio:

With
all these new features in the SharePoint designer, it has now become more
powerful and strong enough for developer to not want to go for custom coding!

Comments
Post a Comment